If you run a website built with Elementor, you know that performance is critical for providing a smooth and seamless user experience. One way to improve the performance of your Elementor website is by using a content delivery network, or CDN.
What is a CDN?
A CDN is a network of servers located around the world that work together to deliver your website’s static assets (e.g. images, CSS files) to users more quickly and efficiently. When a user accesses your website, the CDN will automatically serve the assets from the server that is closest to their location, reducing the distance that the data has to travel and speeding up the load time of your website.
In this article, we’ll show you how to set up a CDN for your Elementor website and configure it for optimal performance. We’ll also provide tips on how to test the performance of your website with a CDN and see the improvements for yourself. An alternative is to sign up for Elementor’s Cloud hosting services, which already has Cloudflare CDN service built-in.
There are a number of content delivery network (CDN) providers that offer support for Elementor websites. Some popular options include:
- Cloudflare: Cloudflare is a widely used CDN provider that offers a range of features and options for optimizing the performance of Elementor websites. It has a user-friendly interface and provides detailed documentation and support to help users get started.
- StackPath: StackPath is a CDN provider that offers a range of features and options for optimizing the performance of Elementor websites. It has a range of pricing plans to suit different needs and budgets, and provides detailed documentation and support to help users get started.
- KeyCDN: KeyCDN is a CDN provider that offers a range of features and options for optimizing the performance of Elementor websites. It has a range of pricing plans to suit different needs and budgets, and provides detailed documentation and support to help users get started.
- BunnyCDN: BunnyCDN is a CDN provider that offers a range of features and options for optimizing the performance of Elementor websites. It has a range of pricing plans to suit different needs and budgets, and provides detailed documentation and support to help users get started. When choosing a CDN provider for your Elementor website, it’s important to consider factors such as the features and options offered, the pricing plans available, and the level of documentation and support provided. It may also be helpful to read reviews and compare different CDN providers to find the one that best meets your needs.

When choosing a CDN provider for your Elementor website, it’s important to consider factors such as the features and options offered, the pricing plans available, and the level of documentation and support provided. It may also be helpful to read reviews and compare different CDN providers to find the one that best meets your needs.
Setting Up a CDN
The first step in using a CDN with your Elementor website is to sign up for an account with a CDN provider, such as Cloudflare or StackPath. Once you’ve created an account and logged in, you’ll need to create a new pull zone for your website. A pull zone is essentially a location where your website’s static assets will be stored and served from. To create a new pull zone, follow the instructions provided by your CDN provider. This may involve adding your website’s domain name and selecting the servers that you want to use to store and serve the assets.
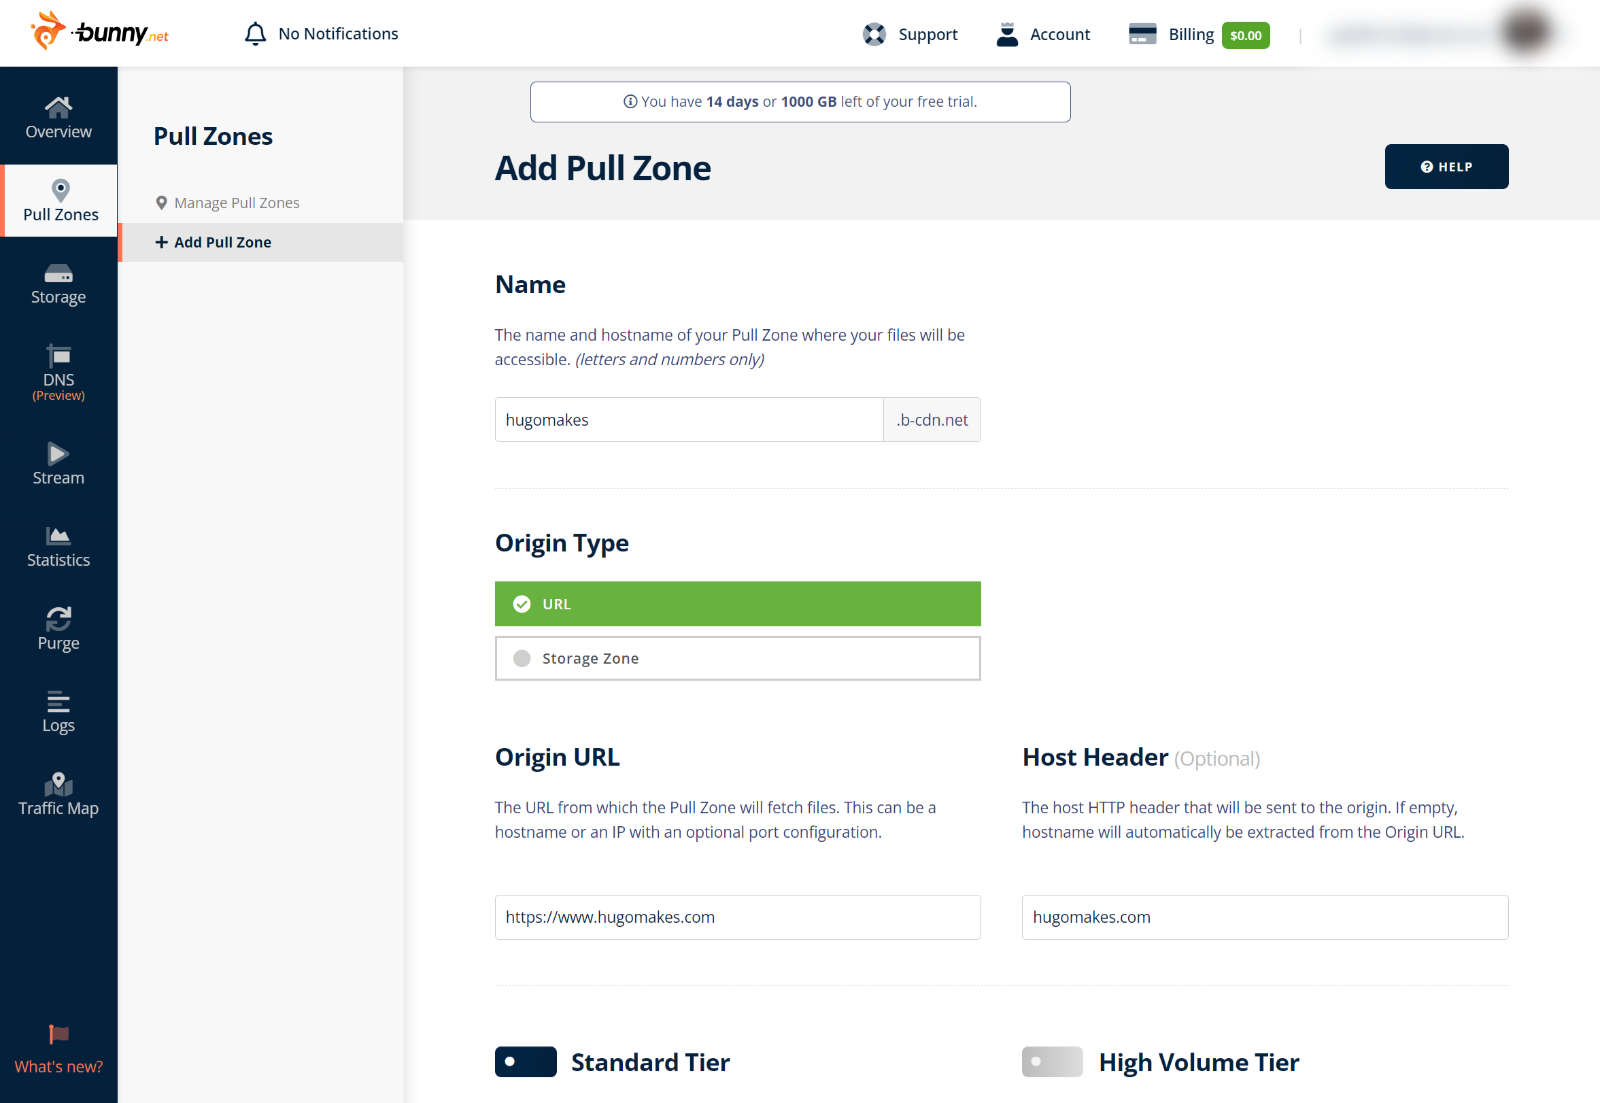
A pull zone is essentially a location where your website’s static assets will be stored and served from. To create a new pull zone, follow the instructions provided by your CDN provider. This may involve adding your website’s domain name and selecting the servers that you want to use to store and serve the assets.
Once you’ve created the pull zone, you’ll need to link it to your Elementor website. This typically involves making some DNS changes at your domain registrar, such as updating the A record or CNAME for your domain. Consult the documentation provided by your CDN provider for specific instructions on how to do this.
Configuring the CDN for optimal performance
Now that you’ve set up the CDN and linked it to your Elementor website, it’s time to configure it for optimal performance. There are a number of options available for optimizing the performance of your website with a CDN, such as:
- Enabling gzip compression: This will compress your website’s static assets, reducing their size and speeding up the transfer time.
- Setting cache expiration times: This will tell the CDN how long to store a copy of your website’s assets in its cache before requesting a new copy from your web server.
- Using the CDN’s image optimization feature (if available): This will automatically optimize your images for faster loading times.
To enable these performance optimizations, you’ll need to access the CDN dashboard and make the necessary changes. Consult the documentation provided by your CDN provider for specific instructions on how to do this.
Testing the performance of the Elementor website with a CDN
Now that you’ve set up and configured the CDN for your Elementor website, it’s time to see the performance improvements for yourself. One way to do this is by using a tool such as GTmetrix or PageSpeed Insights.
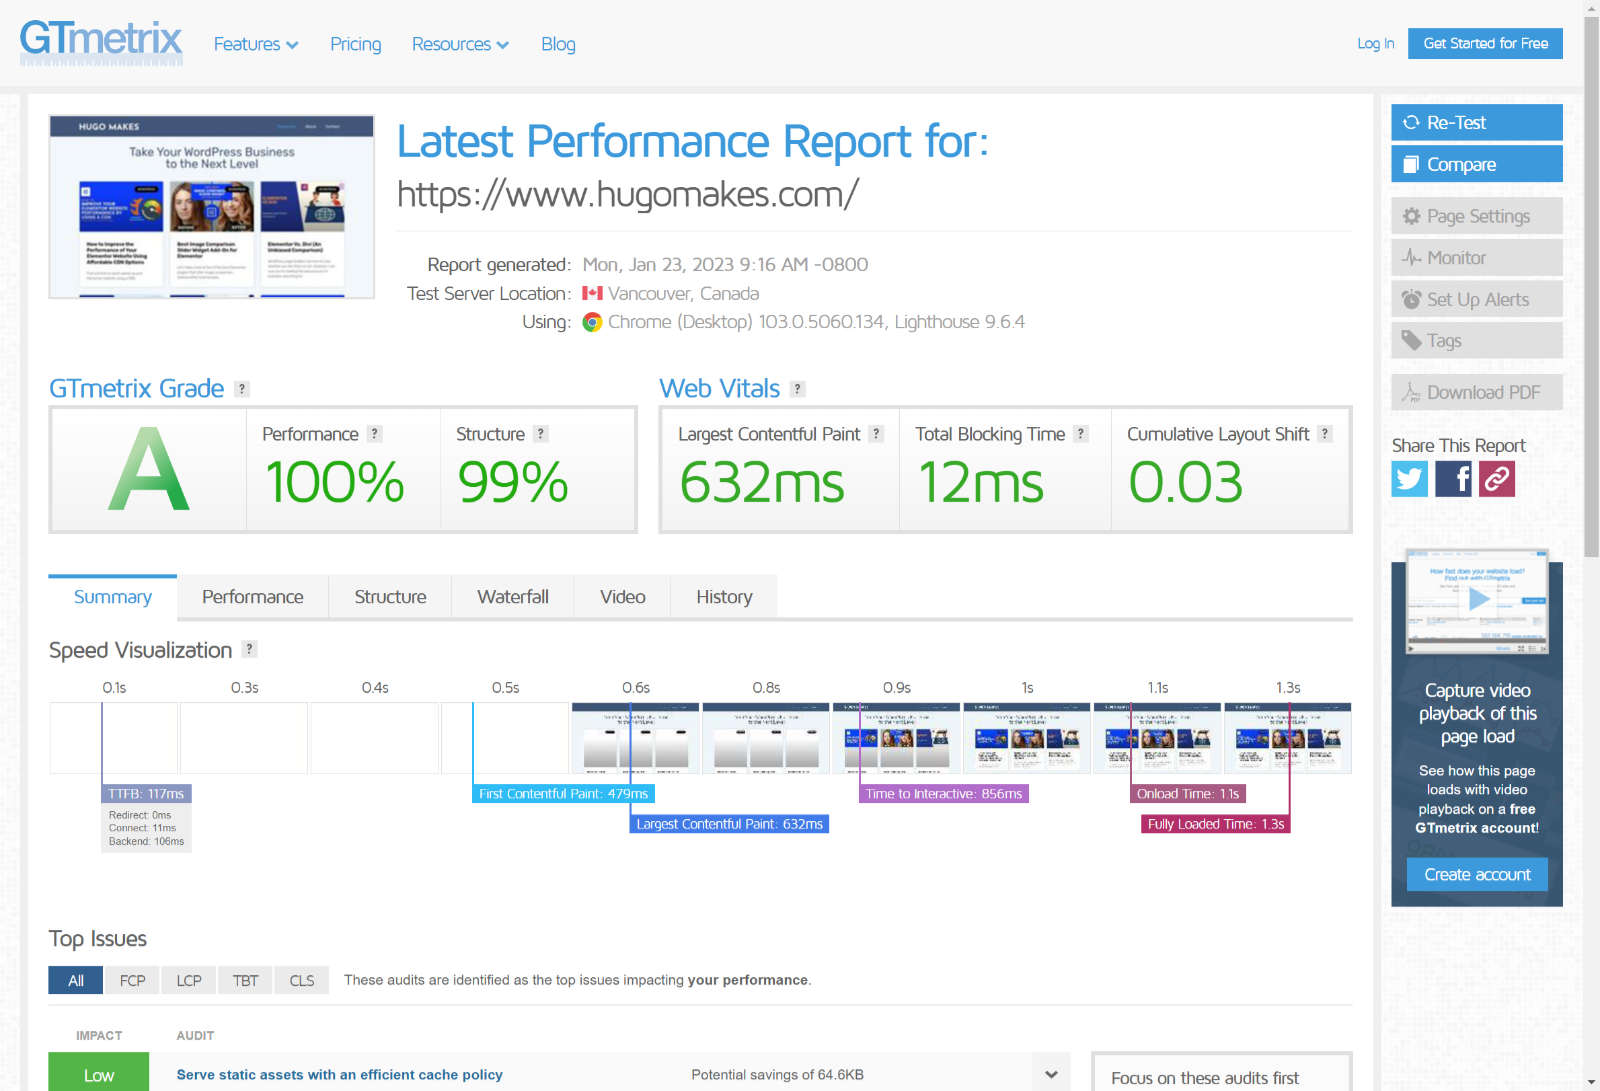
These tools will analyze the performance of your website and provide a score based on various metrics, such as load time, TTFB (time to first byte), and render-blocking resources. Before implementing a CDN, run the test and note the score. Then, after implementing the CDN, run the test again and compare the results.
You should see a noticeable improvement in the performance of your website with a CDN compared to without. If you don’t see a significant improvement, try adjusting the CDN’s performance settings or consult the documentation provided by your CDN provider for additional troubleshooting steps.
In addition to using performance testing tools, you can also use a real user monitoring (RUM) tool to see how the CDN is affecting the performance of your website in the real world. RUM tools track the performance of your website as it is experienced by actual users and can provide valuable insights into how the CDN is impacting the user experience.
Conclusion
Implementing a CDN is an effective way to improve the performance of your Elementor website and provide a better user experience. By setting up a CDN, configuring it for optimal performance, and testing the results, you can see firsthand the benefits of using a CDN and make any necessary adjustments to ensure that your website is running at its best.
If you’re looking to improve the performance of your Elementor website, we recommend giving a CDN a try. With the right CDN provider and the proper configuration, you can see significant improvements in load times and overall performance.